Last update:
More than one year ago CoreOS introduced AWS ALB (Application Load Balancer) support for Kubernetes. This project was born out of Ticketmaster's tight relationship with CoreOS. It was in an alpha state for a long time, so I waited for some beta/stable release to put my hands on it. The project is donated to Kubernetes SIG-AWS on June 1, 2018, and now there is a lot more activity. A few months ago the first stable version got released. Let's try the ALB ingress and see how it compares to Nginx ingress or more advanced Contour ingress that I wrote about in some previous posts.
How Does it Work?
On this picture you can see how ALB ingress fits together with Kubernetes:

And here is a standard ingress controller like Nginx for comparison:
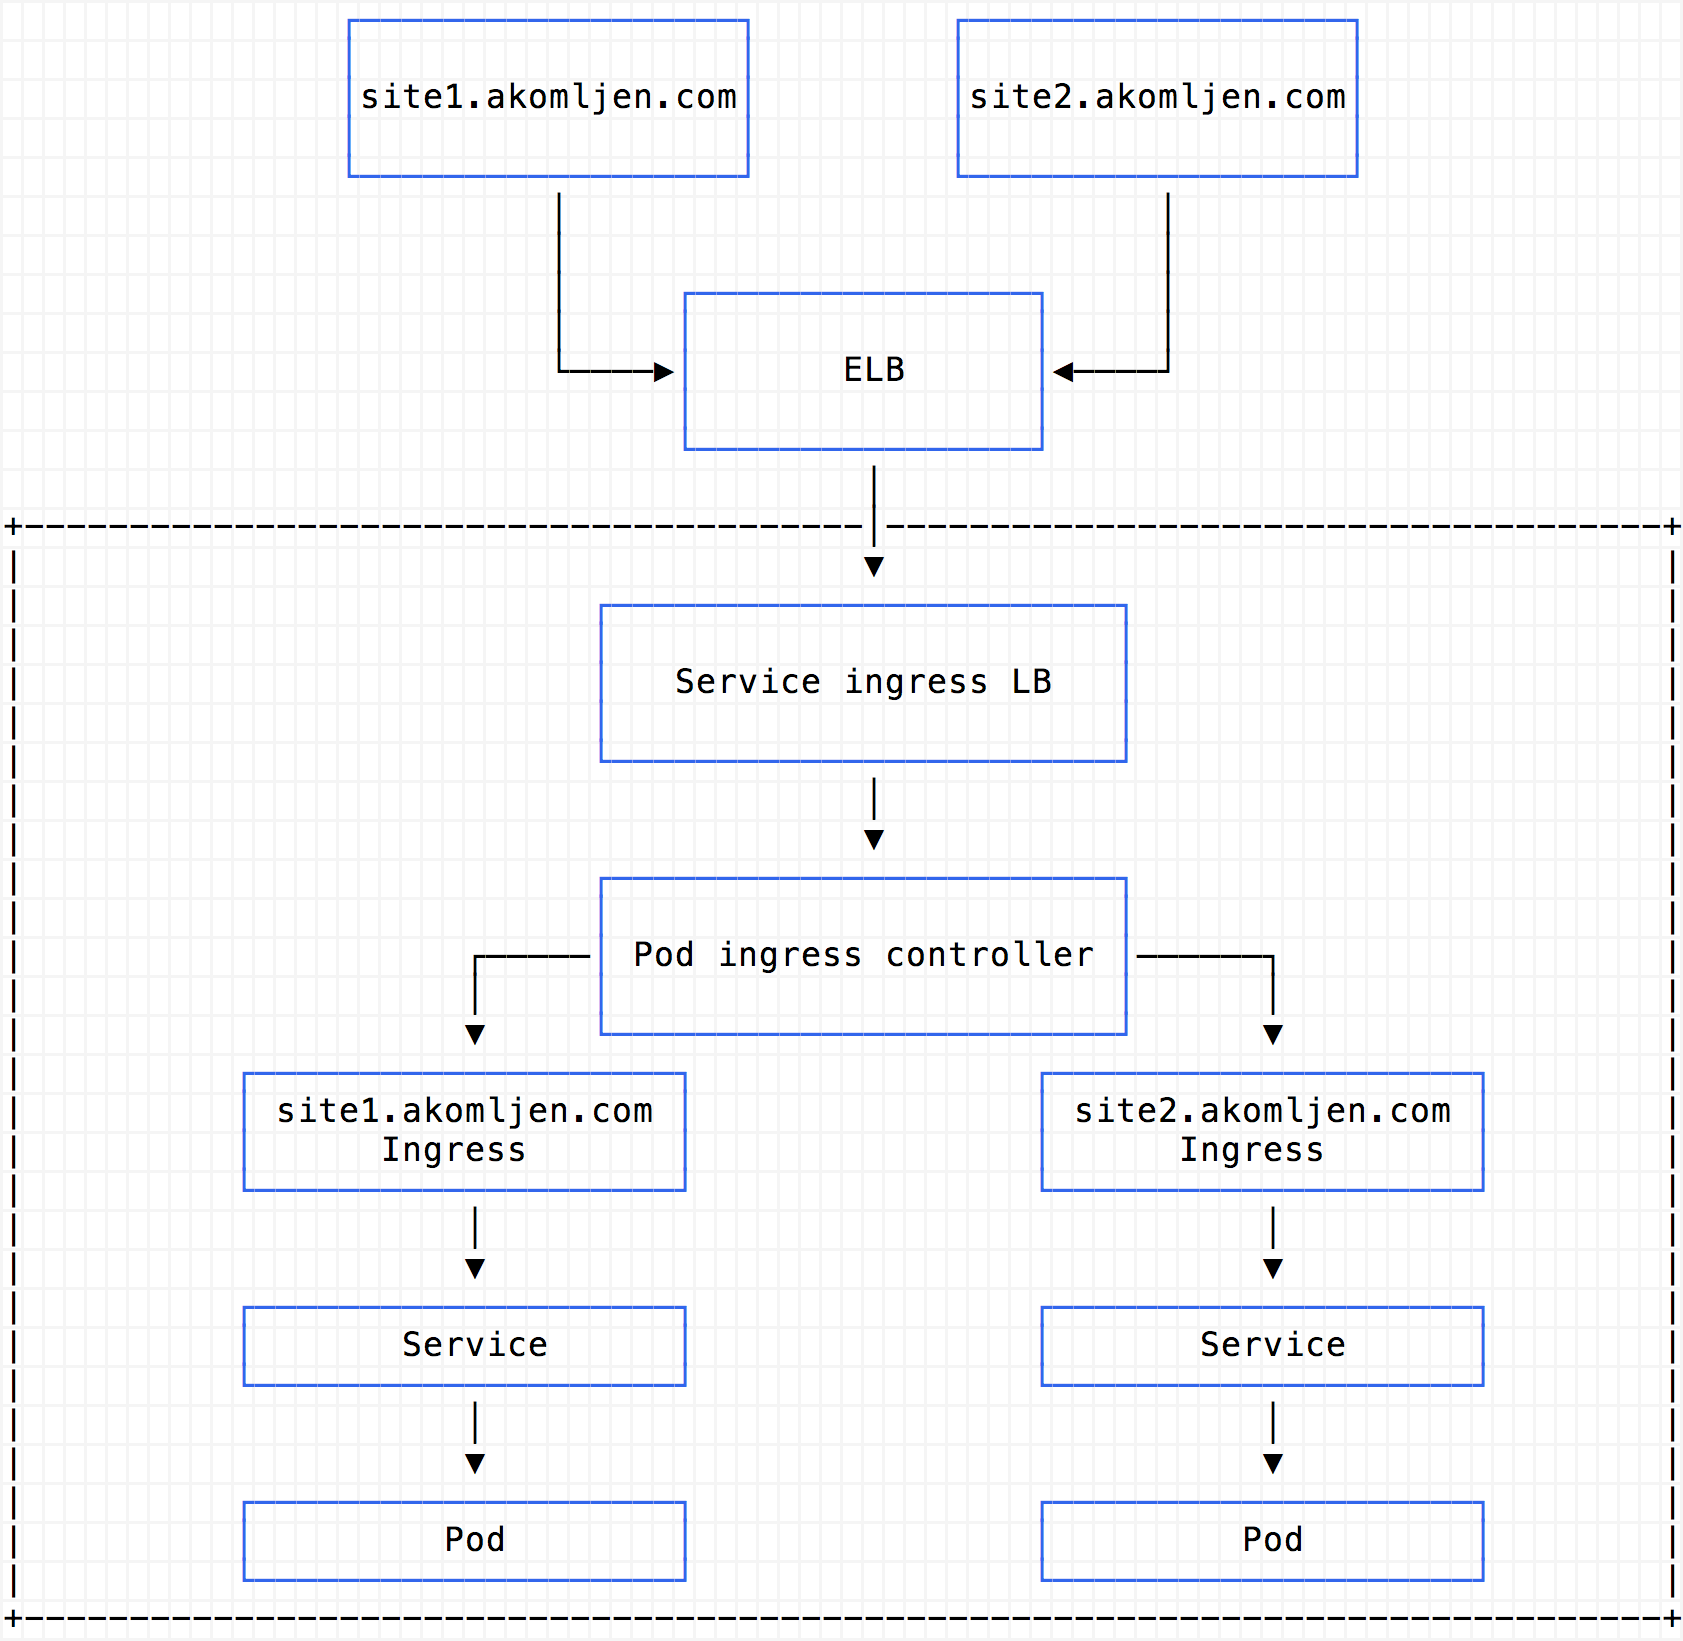
The significant difference when comparing these two is that standard ingress is running in the cluster. Name-based routing and SSL termination are happening inside the pod which shares the same cluster resources as your app. ELB/NLB (Network Load Balancer) acts just like a gateway to the outside world, and only ingress controller service is connected to it.
In the case of ALB, you can clearly see that app services are exposed to nodes via node port and all routing happens inside the ALB. This also means that you cannot use cert-manager with ALB ingress to automatically get SSL certificates for example, because ALB is outside of cluster scope. Instead, you could use AWS certificates, create them in advance and just select which one to use. More on SSL with ALB here.
Managing ALBs is automatic, and you only need to define your ingress resources as you would typically do. ALB ingress controller pod which is running inside the Kubernetes cluster communicates with Kubernetes API and does all the work. However, this pod is only a control plane; it doesn't do any proxying and stuff like that.
Keep in mind that ALB is layer 7 load balancer, so no TCP here. If you want TCP capabilities, you could define NLB and put it in front of ALB. Putting NLB in front also helps if you want static IPs, but it is a manual step.
Deployment
Let's deploy ALB ingress controller with Helm:
$ helm repo add akomljen-charts https://raw.githubusercontent.com/komljen/helm-charts/master/charts/

$ helm install --name=alb \
    --namespace ingress \
    --set-string autoDiscoverAwsRegion=true \
    --set-string autoDiscoverAwsVpcID=true \
    --set clusterName=k8s.test.akomljen.com \
    --set extraEnv.AWS_ACCESS_KEY_ID=<YOUR_ACCESS_KEY> \
    --set extraEnv.AWS_SECRET_ACCESS_KEY=<YOUR_SECRET_KEY> \
    akomljen-charts/alb-ingress
NOTE: Keep in mind that using AWS access and secret keys is not a good idea for production. Check this post - Integrating AWS IAM and Kubernetes with kube2iam.
After a few minutes the ALB controller should be up and running:
 $ kubectl get pods -l "app=alb-ingress,release=alb" -n ingress
NAME                               READY   STATUS    RESTARTS   AGE
alb-alb-ingress-5bcd44fb59-mtf65   1/1     Running   0          1m
Actual ALB will not be created until you create an ingress object which is expected. Let's try to create some sample app:
$ cat > sample-app.yaml <<EOF
apiVersion: apps/v1
kind: Deployment
metadata:
  name: blog
spec:
  selector:
    matchLabels:
      app: blog
  replicas: 3
  template:
    metadata:
      labels:
        app: blog
    spec:
      containers:
      - name: blog
        image: dockersamples/static-site
        env:
        - name: AUTHOR
          value: blog
        ports:
        - containerPort: 80
---
apiVersion: v1
kind: Service
metadata:
  labels:
    app: blog
  name: blog
spec:
  type: NodePort
  ports:
  - port: 80
    protocol: TCP
    targetPort: 80
  selector:
    app: blog
EOF

$ kubectl create -f sample-app.yaml

$ kubectl get all --selector=app=blog
NAME                        READY   STATUS    RESTARTS   AGE
pod/blog-696457695f-6h9h2   1/1     Running   0          21s
pod/blog-696457695f-bws5v   1/1     Running   0          21s
pod/blog-696457695f-qqc8h   1/1     Running   0          21s

NAME           TYPE        CLUSTER-IP      EXTERNAL-IP   PORT(S)   AGE
service/blog   ClusterIP   100.67.82.181   <none>        80/TCP    20s

NAME                              DESIRED   CURRENT   READY   AGE
replicaset.apps/blog-696457695f   3         3         3       21s
Service of the app needs to be exposed as NodePort (picture 1) for ALB to function properly.
When creating an ALB ingress resource you need to specify at least two subnets using alb.ingress.kubernetes.io/subnets annotation. You could also rely on subnet auto-discovery, but then you need to tag your subnets with:
kubernetes.io/cluster/<CLUSTER_NAME>: ownedkubernetes.io/role/internal-elb: 1(for internal ELB)kubernetes.io/role/elb: 1(for external ELB)
If you deployed Kubernetes cluster with kops, subnet tags already exist and you should be fine. By default ALB will be internal, so you need to add alb.ingress.kubernetes.io/scheme: internet-facing annotation if you want to access the app externally. Check the full list of annotations supported by ALB ingress to suit your needs. Now, let's create the ALB ingress resource for the above app:
$ cat > ingress.yaml <<EOF
apiVersion: extensions/v1beta1
kind: Ingress
metadata:
  name: blog
  labels:
    app: blog
  annotations:
    kubernetes.io/ingress.class: alb
    alb.ingress.kubernetes.io/scheme: internet-facing
spec:
  rules:
    - http:
        paths:
          - path: /*
            backend:
              serviceName: blog
              servicePort: 80
EOF

$ kubectl apply -f ingress.yaml

$ kubectl get ingress -o wide
NAME   HOSTS   ADDRESS                                                             PORTS   AGE
blog   *       f5427a54-default-blog-c930-1940190599.eu-west-1.elb.amazonaws.com   80      5m21s
NOTE: If you specify a host for ingress, you need to add ALB address to Route53 to be able to access it externally. Or, deploy external DNS to manage Route53 records automatically, which is also recommended.
The sample app should be available using the above ingress address.
One ALB for All Hosts
For each additional ALB ingress resource, the completely new ALB will be created. You maybe want as few ALBs as possible for all ingresses instead of 1-to-1 mapping - check this issue for more details. Luckily there is a workaround that you could use, meet the ingress merge controller.
This is how it works:
- You create ingress objects like usual, but they need to be annotated with
kubernetes.io/ingress.class: mergeandmerge.ingress.kubernetes.io/config: <CONFIG_MAP_NAME>where you specify a config map name which holds the annotations for resulting ingress - Merge controller watches for ingress resources annotated with
kubernetes.io/ingress.class: mergeand using defined config map, merges them together resulting in new ingress object
Let's deploy the ingress merge controller and try it:
$ helm repo add akomljen-charts https://raw.githubusercontent.com/komljen/helm-charts/master/charts/

$ helm install --name imc \
    --namespace ingress \
    akomljen-charts/merge-ingress

$ kubectl get pods --selector=app=merge-ingress -n ingress
NAME                                 READY   STATUS    RESTARTS   AGE
imc-merge-ingress-579fcd6f54-kdg8f   1/1     Running   0          55s
First, you need to create a config map which holds annotations for resulting ingress:
$ cat > merged-ingress-cm.yaml <<EOF
apiVersion: v1
kind: ConfigMap
metadata:
  name: blog-ingress
data:
  annotations: |
    kubernetes.io/ingress.class: alb
    alb.ingress.kubernetes.io/scheme: internet-facing
EOF

$ kubectl apply -f merged-ingress-cm.yaml
Then you can delete existing ingress created in the previous step and create the new one, but now use kubernetes.io/ingress.class: merge and merge.ingress.kubernetes.io/config: blog-ingress annotations:
$ kubectl delete -f ingress.yaml

$ cat > merged-ingress.yaml <<EOF
apiVersion: extensions/v1beta1
kind: Ingress
metadata:
  name: blog
  labels:
    app: blog
  annotations:
    kubernetes.io/ingress.class: merge
    merge.ingress.kubernetes.io/config: blog-ingress
spec:
  rules:
    - http:
        paths:
          - path: /*
            backend:
              serviceName: blog
              servicePort: 80
EOF

$ kubectl create -f merged-ingress.yaml

$ kubectl get ingress -o wide
NAME           HOSTS   ADDRESS                                                                 PORTS   AGE
blog           *       f5427a54-default-blogingre-b47d-460392593.eu-west-1.elb.amazonaws.com   80      48s
blog-ingress   *       f5427a54-default-blogingre-b47d-460392593.eu-west-1.elb.amazonaws.com   80      48s
Seeing two ingresses with same ALB address is confusing, but merge ingress controller is just propagating the status of merged ingress blog-ingress to blog ingress.
The downside of using ingress merge controller is that all ingresses shares the same annotations defined in the config map. However, you can create more config maps per ALB ingress group. Then you have the flexibility of using just enough ALBs to cover all groups of ingress resources. Also, for each namespace, you still need another ALB.
Summary
Here you go, a new option to expose your services when running the Kubernetes cluster on AWS. I hope that this post will help you to decide which ingress controller to use and to understand some significant differences when comparing different ingress controllers.