Last update:
Ingress is the built‑in Kubernetes load‑balancing framework for HTTP traffic. With Ingress, you control the routing of external traffic. When running on public clouds like AWS or GKE, the load-balancing feature is available out of the box. You don't need to define Ingress rules. In this post, I will focus on creating Kubernetes Nginx Ingress controller running on Vagrant or any other non-cloud based solution, like bare metal deployments. I deployed my test cluster on Vagrant, with kubeadm.
Create a Sample App Deployment
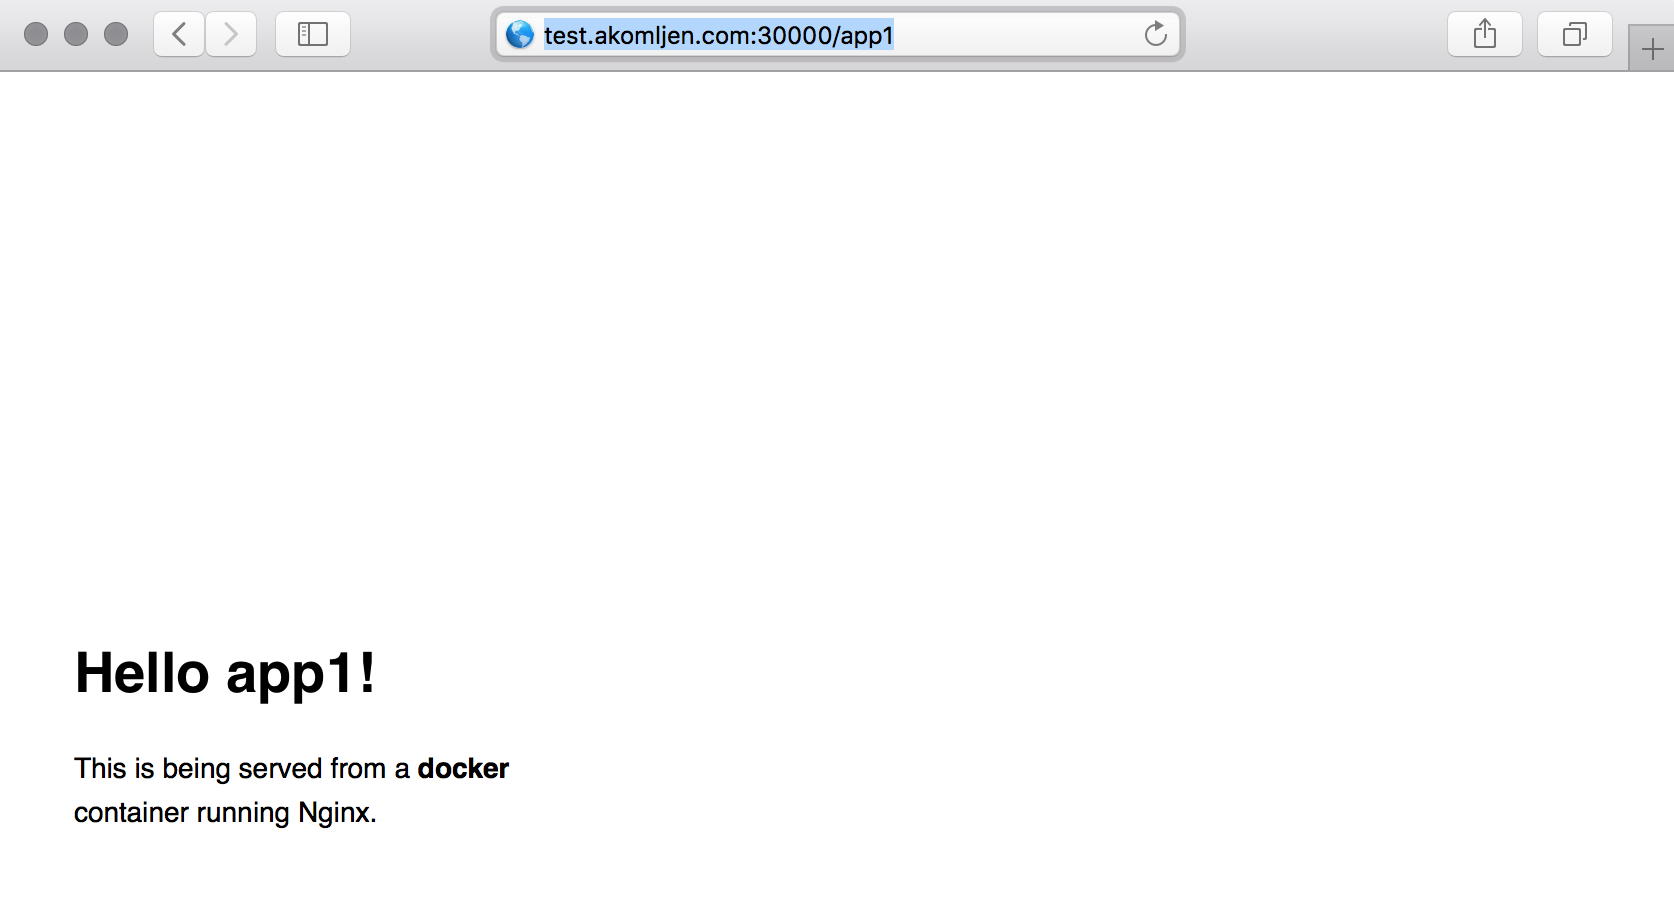
For this lab, let's create two simple web apps based on dockersamples/static-site docker image. Those are Nginx containers that display application name which will help us to identify which app we are accessing. The result, both apps accessible through load balancer:
Here is the app deployment resource, the two same web apps with a different name and two replicas for each:
⚡ cat > app-deployment.yaml <<EOF
apiVersion: extensions/v1beta1
kind: Deployment
metadata:
  name: app1
spec:
  replicas: 2
  template:
    metadata:
      labels:
        app: app1
    spec:
      containers:
      - name: app1
        image: dockersamples/static-site
        env:
        - name: AUTHOR
          value: app1
        ports:
        - containerPort: 80
---
apiVersion: extensions/v1beta1
kind: Deployment
metadata:
  name: app2
spec:
  replicas: 2
  template:
    metadata:
      labels:
        app: app2
    spec:
      containers:
      - name: app2
        image: dockersamples/static-site
        env:
        - name: AUTHOR
          value: app2
        ports:
        - containerPort: 80
EOF
And same for services:
⚡ cat > app-service.yaml <<EOF
apiVersion: v1
kind: Service
metadata:
  name: appsvc1
spec:
  ports:
  - port: 80
    protocol: TCP
    targetPort: 80
  selector:
    app: app1
---
apiVersion: v1
kind: Service
metadata:
  name: appsvc2
spec:
  ports:
  - port: 80
    protocol: TCP
    targetPort: 80
  selector:
    app: app2
EOF
Next, we'll create above resources:
⚡ kubectl create -f app-deployment.yaml -f app-service.yaml
Create Nginx Ingress Controller
If you prefer Helm, installation of the Nginx Ingress controller is easier. This article is the hard way, but you will understand the process better.
All resources for Nginx Ingress controller will be in a separate namespace, so let's create it:
⚡ kubectl create namespace ingress
The first step is to create a default backend endpoint. Default endpoint redirects all requests which are not defined by Ingress rules:
⚡ cat > default-backend-deployment.yaml <<EOF
apiVersion: extensions/v1beta1
kind: Deployment
metadata:
  name: default-backend
spec:
  replicas: 2
  template:
    metadata:
      labels:
        app: default-backend
    spec:
      terminationGracePeriodSeconds: 60
      containers:
      - name: default-backend
        image: gcr.io/google_containers/defaultbackend:1.0
        livenessProbe:
          httpGet:
            path: /healthz
            port: 8080
            scheme: HTTP
          initialDelaySeconds: 30
          timeoutSeconds: 5
        ports:
        - containerPort: 8080
        resources:
          limits:
            cpu: 10m
            memory: 20Mi
          requests:
            cpu: 10m
            memory: 20Mi
EOF
And to create a default backend service:
⚡ cat > default-backend-service.yaml <<EOF
apiVersion: v1
kind: Service
metadata:
  name: default-backend
spec:
  ports:
  - port: 80
    protocol: TCP
    targetPort: 8080
  selector:
    app: default-backend
EOF
We will create those resources in ingress namespace:
⚡ kubectl create -f default-backend-deployment.yaml -f default-backend-service.yaml -n=ingress
Then, we need to create a Nginx config to show a VTS page on our load balancer:
⚡ cat > nginx-ingress-controller-config-map.yaml <<EOF
apiVersion: v1
kind: ConfigMap
metadata:
  name: nginx-ingress-controller-conf
  labels:
    app: nginx-ingress-lb
data:
  enable-vts-status: 'true'
EOF

⚡ kubectl create -f nginx-ingress-controller-config-map.yaml -n=ingress
And here is the actual Nginx Ingress controller deployment:
⚡ cat > nginx-ingress-controller-deployment.yaml <<EOF
apiVersion: extensions/v1beta1
kind: Deployment
metadata:
  name: nginx-ingress-controller
spec:
  replicas: 1
  revisionHistoryLimit: 3
  template:
    metadata:
      labels:
        app: nginx-ingress-lb
    spec:
      terminationGracePeriodSeconds: 60
      serviceAccount: nginx
      containers:
        - name: nginx-ingress-controller
          image: quay.io/kubernetes-ingress-controller/nginx-ingress-controller:0.9.0
          imagePullPolicy: Always
          readinessProbe:
            httpGet:
              path: /healthz
              port: 10254
              scheme: HTTP
          livenessProbe:
            httpGet:
              path: /healthz
              port: 10254
              scheme: HTTP
            initialDelaySeconds: 10
            timeoutSeconds: 5
          args:
            - /nginx-ingress-controller
            - --default-backend-service=\$(POD_NAMESPACE)/default-backend
            - --configmap=\$(POD_NAMESPACE)/nginx-ingress-controller-conf
            - --v=2
          env:
            - name: POD_NAME
              valueFrom:
                fieldRef:
                  fieldPath: metadata.name
            - name: POD_NAMESPACE
              valueFrom:
                fieldRef:
                  fieldPath: metadata.namespace
          ports:
            - containerPort: 80
            - containerPort: 18080
EOF
Notice the \--v=2 argument, which is a log level and it shows the Nginx config diff on start. Don't create Nginx controller yet.
Kubernetes and RBAC
Before we create Ingress controller and move forward you might need to create RBAC rules. Clusters deployed with kubeadm have RBAC enabled by default:
⚡ cat > nginx-ingress-controller-roles.yaml <<EOF
apiVersion: v1
kind: ServiceAccount
metadata:
  name: nginx
---
kind: ClusterRole
apiVersion: rbac.authorization.k8s.io/v1beta1
metadata:
  name: nginx-role
rules:
- apiGroups:
  - ""
  resources:
  - configmaps
  - endpoints
  - nodes
  - pods
  - secrets
  verbs:
  - list
  - watch
- apiGroups:
  - ""
  resources:
  - nodes
  verbs:
  - get
- apiGroups:
  - ""
  resources:
  - services
  verbs:
  - get
  - list
  - update
  - watch
- apiGroups:
  - extensions
  resources:
  - ingresses
  verbs:
  - get
  - list
  - watch
- apiGroups:
  - ""
  resources:
  - events
  verbs:
  - create
  - patch
- apiGroups:
  - extensions
  resources:
  - ingresses/status
  verbs:
  - update
---
kind: ClusterRoleBinding
apiVersion: rbac.authorization.k8s.io/v1beta1
metadata:
  name: nginx-role
roleRef:
  apiGroup: rbac.authorization.k8s.io
  kind: ClusterRole
  name: nginx-role
subjects:
- kind: ServiceAccount
  name: nginx
  namespace: ingress
EOF

⚡ kubectl create -f nginx-ingress-controller-roles.yaml -n=ingress
So now you can create Ingress controller also:
⚡ kubectl create -f nginx-ingress-controller-deployment.yaml -n=ingress
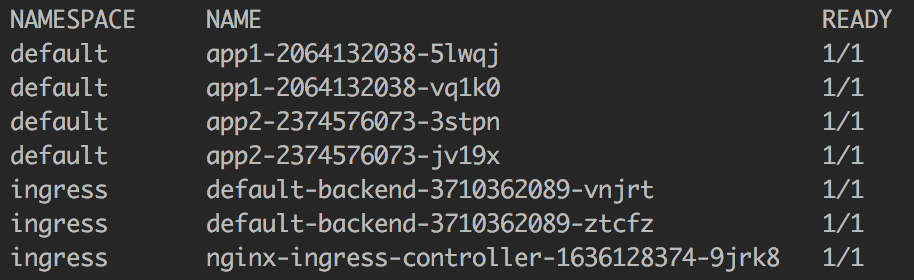
If you check your pods, you should get something like this:
Create Ingress Rules for Applications
Everything is ready now. The last step is to define Ingress rules for load balancer status page:
⚡ cat > nginx-ingress.yaml <<EOF
apiVersion: extensions/v1beta1
kind: Ingress
metadata:
  name: nginx-ingress
spec:
  rules:
  - host: test.akomljen.com
    http:
      paths:
      - backend:
          serviceName: nginx-ingress
          servicePort: 18080
        path: /nginx_status
EOF
And Ingress rules for sample web apps:
⚡ cat > app-ingress.yaml <<EOF
apiVersion: extensions/v1beta1
kind: Ingress
metadata:
  annotations:
    nginx.ingress.kubernetes.io/rewrite-target: /
  name: app-ingress
spec:
  rules:
  - host: test.akomljen.com
    http:
      paths:
      - backend:
          serviceName: appsvc1
          servicePort: 80
        path: /app1
      - backend:
          serviceName: appsvc2
          servicePort: 80
        path: /app2
EOF
Notice the nginx.ingress.kubernetes.io/rewrite-target: / annotation. We are using /app1 and /app2 paths, but the apps don’t exist there. This annotation redirects requests to the /. You can create both ingress rules now:
⚡ kubectl create -f nginx-ingress.yaml -n=ingress
⚡ kubectl create -f app-ingress.yaml
Expose Nginx Ingress Controller
The last step is to expose nginx-ingress-lb deployment for external access. We will expose it with NodePort, but we could also use ExternalIPs here:
⚡ cat > nginx-ingress-controller-service.yaml <<EOF
apiVersion: v1
kind: Service
metadata:
  name: nginx-ingress
spec:
  type: NodePort
  ports:
    - port: 80
      nodePort: 30000
      name: http
    - port: 18080
      nodePort: 32000
      name: http-mgmt
  selector:
    app: nginx-ingress-lb
EOF

⚡ kubectl create -f nginx-ingress-controller-service.yaml -n=ingress
If you are running everything on VirtualBox, as I do, forward ports 30000 and 32000 from one Kubernetes worker node to localhost:
⚡ VBoxManage modifyvm "worker_node_vm_name" --natpf1 "nodeport,tcp,127.0.0.1,30000,,30000"
⚡ VBoxManage modifyvm "worker_node_vm_name" --natpf1 "nodeport2,tcp,127.0.0.1,32000,,32000"
Also add test.akomljen.com domain to hosts file:
⚡ echo "127.0.0.1 test.akomljen.com" | sudo tee -a /etc/hosts
You can verify everything by accessing at those endpoints:
http://test.akomljen.com:30000/app1
http://test.akomljen.com:30000/app2
http://test.akomljen.com:32000/nginx_status
NOTE: You can access apps using DNS name only, not IP directly!
Any other endpoint redirects the request to default backend. Ingress controller is functional now, and you could add more apps to it. For any problems during the setup, please leave a comment. Don’t forget to share this post if you find it useful.
Summary
Having an Ingress is the first step towards the more automation on Kubernetes. Now, you can have automatic SSL with Let's encrypt to increase security also. If you don't want to manage all those configuration files manually, I suggest you look into Helm. Instaling Ingress controller would be only one command. Stay tuned for the next one.